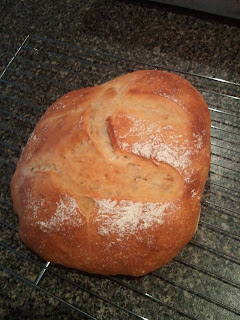
I've been fiddling around with a new recipe I discovered on the net. A lovely lady in Michigan in the US presents this recipe and frankly I can't improve upon it. I can confirm that it's as easy as she says though.
This recipe has some great advantages:
- no need to knead
- all the hard work is done in the fridge while you do something else. It can sit there for any time between no time and 2 weeks (I've snuck more time out of it, but don't tell)
- it only has to sit for 30 mins before going into a hot oven (which happens to be exactly the same amount of time it takes for my oven to get to 230C, tee hee)
- it tastes like you imagine bread used to taste before preservatives intervened
- it's only got 4 ingredients
- any wally can make it
- it's chewy
- it's crackly and crisp on top!!
I have been trying to go for a walk every morning up the hill to Vogeltown and back. The bread making fits very nicely into that routine – turn on the oven, shape the dough, go for walk, get home, sprinkle sesame seeds, put dough in oven, shower, take bread out of oven, cool it on rack, try to wait until bread is cool before eating, fail, eat, enjoy!
I know you don't always need to know my morning routine, but I thought you'd like to know how easy it is to make fresh bread in the morning. It feels like a treat every time I do it and it can be almost whatever shape I want to make it, not like those breadmaker thingys.
 | |
| Salty, rosemary-y flatbread |
- 3c luke warm water
- 1.5 T instant dry yeast (I use Edmund's)
- 1.5 T salt
- 6.5c standard flour
You can do this either in a bowl, in which case you will need some plastic wrap, or a lidded plastic container. Mix all that together until it's a sloppy dough and consistent in texture. If you're using a bowl, loosely cover with plastic wrap or a teatowel. Don't seal the bowl completely. If using a plastic container with a lid do not put the lid on completely. You want to allow gases to get in and out. This is a living thing baby, let it breathe. Leave on bench/bed/windowsill/table for at least 2 hours, more if you like. No harm can come to it. Don't put it in the sun.
(I do this in a plastic container that I just reuse. Don't wash it between batches, the leftovers make the next batch better and the one after that better again.)
 | |
| New dough |
After 2 hours, you can use it straight away, or store it in the fridge for later. Either way, instructions follow. You've got enough here for at least 4 decent sized loaves, more if you make smaller ones, obviously.
To make bread, heat oven to 230C, including a flat oven tray in the centre of the oven and a roasting dish or similar on a shelf under the tray. This is for creating steam to crispen the crust.
 |
| Dough after it's been in the fridge. See bubbles formed. |
Then grab a handful or two or three of the dough. Now, it is likely to be quite sticky, so you will probably want to dust you hands with flour first. The flour is just to limit the amount of dough that stays on your hands, not for making the dough drier.
Shape the dough into whatever approximate shape you want your bread to be. It will rise, so keep that in mind. When shaping you want to pull the parts of the dough under so that the top is stretched across it. This is what Elaine McCardel from Michigan calls a gluten cloak. The bottom will be untidy, but that's fine.
 | |
| Dough is quite sticky |
Place this mound lovingly on a piece of baking paper or, better still, a reusable baking sheet on another baking tray or something else flat (so you can slide it all off later). Wander off (or to Vogeltown) for 30 mins. When you get back, and provided your oven is hot, sprinkle the dough with something if you want to (sesame seeds, extra flour, rosemary, salt, oil, an egg wash...) and then make some neat or not slashes in the top of the dough with a nice sharp knife. The slashes are important. Don't worry if the dough doesn't look like it's risen (mine never really does). It will do so in the oven (believe me).
Gently slice the paper/sheet and bread on to the hot baking tray. Pour a cup of cold water into the hot roasting dish to create steam. Cook for 20-35 minutes depending on the size of the loaf (until the bottom of the bread sounds hollow when tapped).
Cool on a rack. It's true that this bread's texture improves when its cooled down, but it's very hard to wait. If you don't wait, nothing bad will happen! I store uneaten bread (of which there is very little) wrapped in a teatowel in the cupboard, not the fridge. But it's definitely best on the day it's cooked.
According to Elaine you can experiment with different mixtures of flours. Go for it. I have been experimenting with shapes. I've made long loaves, round buns and sort-of-flat bread – flat enough to slice horizontally and fill. That last one had rosemary and salt on it, and criss-cross slashes. All were a triumph!
 |
| Crispy morning bread |
Here's Elaine's lovely blog on this exact subject: The Italian Dish Artisan Bread
Check out the rest of her site too. It's a trea.


No comments:
Post a Comment