About Me

My photo
Wellington, New Zealand
Food lover. Food talker. Now food writer.

Saturday 30 November 2013

Home-made Hot Smoked Salmon - yes you can


I love hot smoked salmon. I can take or leave the cold smoked, but the hot (ie cooked) smoked salmon I find versatile and scrummy and I’m told the oils are good for the brain and for your mood.  So the perfect food. 

Except that it’s really expensive.
So I’ve been making my own. Sounds difficult, but is not!

Firstly, you’ll need something to smoke in.  You can buy something new, but I bought something old – from the Sally’s around the corner.  A decades old roasting dish.  I only use it for smoking, so it doesn’t matter how tarnished it gets and it does the trick beautifully. 


That plus tin foil and something that will smoke when it’s hot are the only essentials.  The rest are choices. 
Here’s how I do it.

I line the roasting dish with tin foil.  Then sprinkle that with something to burn.  I’ve been using this wood recently. 
But in the past, I’ve tried rice.  You need something to slowish burn – so wood or rice are good.  Then some flavours – the wood is pre-flavoured being lovely manuka and kanuka. I’ve also soaked it in booze (pinot gris – cougar-juice as someone advised me the other day – or beer work well).  If you do soak in booze, then let it dry afterwards.  Or at least semi-dry.  Try rosemary or tea (green or earl grey maybe) as flavour enhancers.
On top of that, you need another piece of foil.  If you’re lucky enough to have a metal rack that fits in your dish, this is where it comes in. I don’t, so it’s foil for me!

On the foil goes the fish (pin bones removed with tweezers if it’s salmon).  I used to oil the foil, but forgot to once and the fish didn’t stick so now I skip that step. 
There’s more options for flavour here.  Some add salt, pepper and a bit of sugar.  Chilli flakes would be good.  Or one of those steak rubs.  I’ve been using the smoked salt Smoke & Spiced Solar Salt from The Original Smoke and Spice Co.  It’s brilliant.

Once you’ve flavoured the salmon – or not, it’ll be grand without more flavour – it’s time to get hot.  I put the whole thing on the very  hottest element and turn the element up.  Once it starts smoking, which can be a matter of a minute or so, I turn it down to low (though it’s quite a big element, so it’s still pretty hot) and time the fish for 5 minutes.  No more. 
If you can avoid peeking, please do.  The smoke can ruin curtains! 

Once the 5 minutes are up, turn the heat off.  Don’t lift the lid!  Then let it cool.  And enjoy.  In pasta, on pizza, in salads, on crackers, make it into a mousse with crème fraiche.  Try this terrine.  Put it in pie.
 

I have done this with white fish, which also worked well.  I made that into traditional fish pie, in combination with fresh fish. 

Sunday 22 September 2013

Pigs in a mud spa

It’s my partner’s birthday tomorrow so I made cake for him and, apparently, his workmates.  It’s very cute so I thought I’d share it.
 
The power of this is in the decoration.  I made chocolate beetroot cake, one of my favourite chocolate cakes.  You could make anything you like.  Any chocolate or vanilla or lemon cake, even fruit cake if you’re into landfill, would work.  The construction is the impressive part.
 
I based the bits beyond the actual cake on the one on this site: fine craft guild with personal adaptations. 
 
I’ll give you my Beetroot Chocolate Cake recipe to use if you want to.  Because of the beetroot, this is a moist cake which gets better with (a little bit of) age. 
 
Line one large or two medium sized cake tins with cooking paper and oil spray.  This is a big cake, so you can make two if you want to.  If you do that, for this particular decoration you can stack them one on top of the other, filled with ganache or something else.  I made one cake. 
 
Pre-heat the oven to 180°C.
 
Take a huge bowl and sift into it:
2 ½ c plain flour
2 t baking soda
½ c cocoa (use the good stuff)
1 t salt
 
Drain an 850g can of beetroot.  Set aside. 
 
In a food processor, mix together:
4 eggs
2 c sugar
1 ½ c cooking oil (I use canola)
2 t vanilla essence
 
Mix that into the flour.  In the meantime, and don’t mess abut as you don’t want the soda to get too excited before the whole thing goes in the oven, blend the beetroot to a fine slush in the food processor (don’t bother to clean the bowl of the food processor). 
 
Mix that into the flour and sugar mixture and pour into the tin(s).  Cook for 45-50 minutes for 2 tins, longer for one large one.  It’s cooked when a skewer comes out clean when poked all the way through.  Cool completely before decorating.  I cut the very top off the cake to make it a bit flatter before decorating. 
 
So for the fun, impressive decorating bit.
 
Pour 1 ½ cups of cream into a clean saucepan.  When it’s hot but not boiling, take it off the heat and stir 200g of dark chocolate into it until it’s all melted together.  This is called ganache.  Set aside until it cools. 
 
To make the pigs I used white pre-made fondant mixed with a tiny amount of pink food colouring.  The fondant needs playing with to make it pliable and mouldable.  Mould into pig shapes – anything you like.  I used these shapes:


Make sure that they’re cool and hard before you place them on the cake.
 
Once the ganache is set and spreadable, which may take a while (I chilled it in the fridge for a bit) and when the cake is cool.  Spread some ganache around the edge of the cake and and stick chocolate fingers around it to resemble a fence.  Other recipes use Kitkats.  I wonder if twix would work?  Tie a ribbon around the ‘fence’ to keep it all there.  Clearly a pink one is the best idea.
 
 
Pour/spread the rest of the ganache on the top of the cake.  The ganache needs to be quite thick at this point to ensure that it doesn’t slip through the fence.  Gently park the pigs in the most elegant poses possible and chill for an hour before serving. 
 
 
Please send me photos of yours.  I like the idea of it with frogs instead of pigs.  Are you game?


Saturday 7 July 2012

Wonderful Watercress, Perfect Puha

My masseuse gave me some puha/watercress from a river up north somewhere, so I did what I love to do with a bunch of fine veges – made simple soup to bring out the flavour.  We did this last week with Jerusalem artichokes and that was awesome (scrubbed but unpeeled sliced with chicken stock, softened onion, garlic, parmesan and that’s about it).  But Jerusalem artichoke soup isn’t such a gorgeous colour like the watercress, so here’s the watercress recipe. 

Watercress Soup
Makes enough for 2 generous portions (dictated by the amount of watercress I had).
Finely chop
·         half an onion
Gently cook it in a medium sized saucepan in a tablespoon of olive oil over a low heat until soft and translucent.  Do this slowly.
slow cooking onions
Add
·         1 and ¾ cups of vegetable stock
Bring to gentle boil for couple of minutes.

Trim and chop

·         120g (that’s what I had) of watercress
watercress goes in
Tip into the saucepan.   Simmer 3 minutes or so until the watercress has completely wilted.  Take off the heat and stir in

·         a good tablespoon or two of sour cream
And then blend – either with a stick or benchtop blender until smooth.  Return to rinsed pot to reheat and add salt, pepper and lemon juice to taste.  The amount of pepper will depend on how peppery your watercress is to start with, obviously. 
green bowl of glory
Go green!!
evidence of enjoyment!

Saturday 26 May 2012

Lemon Meringue Cake of Dreams!

This week at work we have been competitive baking.  This is the cake that won (!) against some very stiff competition, notably a hazelnut torte.
The finished cake, slice removed!
I absolutely love this cake.  This is because I absolutely love lemons.  And meringue.  And Pav the boyfriend loves it too; it’s the one he requests most frequently for his birthday cake.

It’s not that hard, but it is a bit time consuming and has a couple of interesting techniques.  It is however absolutely achievable.  It’s a Julie Le Clerc recipe from issue 99 of Cuisine.  If you’re into baking, you can do a lot worse that Julie Le Clerc as your guide.
Lemon Meringue Cake

There are 3 recipes here.  All with sugar and eggs and 2 of them with lemons.  Best to give them separately, so you don’t get confused.  But you do need 9 eggs in total, and about 10 lemons to be safe.  Plus 2 and a half cups of caster sugar.  You’ll need at least 3 bowls too – or some intra-baking washing up, at the very least. 

I do the ‘chiffon cake’ first.  To me, this is the hardest part because you can mix too much and mix too little (which is possibly worse).  But take care and you’ll be fine.  Grease and line the bottom of a 20cm cake tin and heat the oven to 170C on fan-bake. 

Firstly, sift together and set aside in a bowl:
·         1 c flour
·         1.5 t baking powder
·         Pinch of salt

Then separate:
·         3 large room temperature eggs

If you need advice on separating eggs, here’s how I do it: with my hands.  Because your hands are soft, I think they’re the best tool for not breaking the yolk.  It’s fatal to beating eggs to get yolk in it, so be very careful.  Here’s my egg separating technique: over a cup (not the bowl you want to beat in) gently crack an egg.  Carefully pull the shell apart and empty the egg into you hand at the finger part.  Split your fingers a little bit and let the white run through into the cup.  Gently pass the yolk from hand to hand – always over the slightly split fingers – letting the white dribble into the cup and being sure not to break the yolk at all.  Put the yolk into a large bowl (this is the bowl which will eventually hold the whole cake batter).  So long as there is no yolk in white in the cup, pour that into a bowl for beating.  The advantage of this method (apart from using your soft soft hands) is that if you do break a yolk and get it in the white, then you only ruin one white, rather than any others that happen to be in the bowl you’re working with.  If you do ‘ruin’ a white, don’t despair. You need 2 full eggs for the lemon curd.

Right, so you’ve got two bowls, one with 3 yolks, one with 3 whites. (Three bowls if you count the flour mixture.)
Beat the whites with
·        a pinch of cream of tartar
until soft peaks form.  Then, while still beating, gradually add
·         ¼ c caster sugar
until stiff, glossy peaks are formed (about 2 minutes with an electric beater, longer by hand).  If you can turn the bowl upside down without getting egg white on your shoes, you’re good to go.  Set this aside for a moment while you deal with the yolks.

Add to the yolks:
·         Finely grated zest of 1 lemon
·         ½ c caster sugar
And beat for 5 minutes until very thick and pale.   If you do it in this order, you don’t need to clean the beater blades between the whites and the yolks.  Then gradually add (while still beating):

·         ¼ c fruity olive oil or canola oil

Then continue beating gently while alternating between adding the flour mixture and
·         1/3 c lemon juice (approx 3-4 lemons worth)

Beat only just enough to make a smooth batter.

Take the whites and stir a ¼ of them into the yolk mixture.  Then gently fold in all the whites into the yolk mixture; take care not to lose the air you’ve worked so hard to beat in.  You do need a smooth, uniform coloured mixture here.  I’ve done that wrong in the past, and it wasn’t impressive.
Bake for 35-40 minutes until top springs back when pressed with your finger.
Just out of the oven
While the cake bakes, make the lemon curd.  You can pass on this part and buy some, but you will be left with 4 yolks that you have no use for.  I reckon it’s less hassle to make the curd than it is to find a use for the yolks later!

Beat together:

·         4 large egg yolks
·         2 large whole eggs

Then add the remainder of these ingredients into a heavy-based saucepan:
·         ¾ c caster sugar
·         Finely grated zest of 1 lemon
·         ½ c lemon juice (approx 5-6 lemons)
·         125g unsalted butter in rough chunks

(It’s easier to zest the lemon before you juice it.)
Before the butter melts
Place the saucepan over a low heat and stir with a metal spoon constantly until the butter melts.  Once it’s melted stir constantly for another 7 minutes or so until the curd forms and coats the back of the spoon as shown. 
Lemon curd coating the back of the spoon and therefore done!
It will be thinner than the stuff you buy because it’s hot.  It will thicken on cooling.  Don’t walk away while making the curd as it can change texture quickly and the bottom half tends to go quicker than the top.  You need to move it around. 
Once it’s the right consistency, take the curd off the heat and continue stirring intermittently as it cools.  I think this helps with both cooling and making sure the right texture is achieved. 
By now the cake will be almost done.  Once cooked, take it out of the oven and cool on a rack. 
Once both the curd and the cake are cool, the fun starts.  Place the cake flat on a board or something else without a lip.  You now need to cut the cake into 3 or 4 rounds (I’ve only ever managed 3) parallel to the ground.  I have an ancient electric knife I use for this, but it’s fine to use a breadknife or normal knife.  Be careful, don’t rush it.  I find it helps to turn the board while cutting from the side to the middle, rather than try to cut all the way through from one side to the other. 
Now spread the bottom layer with curd, place the next cake layer on top and spread again.  Repeat with your 3-4 rounds of cake, ending with the top of the cake.  Place in the fridge to chill for half an hour.

Now for the Swiss meringue and final baking. 

Heat the oven to 200C.  In a nice clean glass bowl (must not be plastic), combine:
·         4 egg whites left over from the curd
·         1 c caster sugar
·         1 t vanilla essence

Place the bowl over a saucepan of simmering water, without letting the water touch the bowl.  
Beat for 5 minutes until the sugar has dissolved and the mixture is hot.  Remove from the heat and beat for 10 more minutes until the mixture is stiff and glossy.  
Swiss meringue as it goes on the 3 layers of cake
Take the cake out of the fridge and place on a flat room temperature baking tray and gently pile the meringue on the cake – spread around the sides and across the top.   Do this without tearing at the cake or filling.  Make decorative swirls as you like on the meringue. 
Before baking
Place in the oven and watch like a hawk for about 4-5 minutes until the meringue starts to turn brown on the tips. 
After final baking
Remove from the oven and transfer to a plate to be proudly served.  Needs no accompaniments.  Expect spontaneous acclamation. 
Keeps for 2-3 in the fridge, but its physical beauty fades over that time.


Saturday 24 March 2012

No Knead - All Excellent - Bread


I've been fiddling around with a new recipe I discovered on the net. A lovely lady in Michigan in the US presents this recipe and frankly I can't improve upon it. I can confirm that it's as easy as she says though.

This recipe has some great advantages:
  1. no need to knead
  2. all the hard work is done in the fridge while you do something else. It can sit there for any time between no time and 2 weeks (I've snuck more time out of it, but don't tell)
  3. it only has to sit for 30 mins before going into a hot oven (which happens to be exactly the same amount of time it takes for my oven to get to 230C, tee hee)
  4. it tastes like you imagine bread used to taste before preservatives intervened
  5. it's only got 4 ingredients
  6. any wally can make it
  7. it's chewy
  8. it's crackly and crisp on top!!

I have been trying to go for a walk every morning up the hill to Vogeltown and back. The bread making fits very nicely into that routine – turn on the oven, shape the dough, go for walk, get home, sprinkle sesame seeds, put dough in oven, shower, take bread out of oven, cool it on rack, try to wait until bread is cool before eating, fail, eat, enjoy!


I know you don't always need to know my morning routine, but I thought you'd like to know how easy it is to make fresh bread in the morning. It feels like a treat every time I do it and it can be almost whatever shape I want to make it, not like those breadmaker thingys.
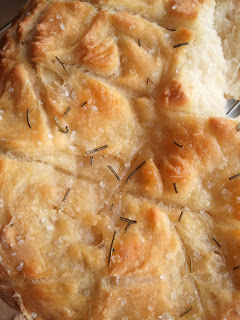
Salty, rosemary-y flatbread
 I hope you find a place in your life for this too.   Here's the recipe:
  • 3c luke warm water
  • 1.5 T instant dry yeast (I use Edmund's)
  • 1.5 T salt
  • 6.5c standard flour
You can do this either in a bowl, in which case you will need some plastic wrap, or a lidded plastic container. Mix all that together until it's a sloppy dough and consistent in texture. If you're using a bowl, loosely cover with plastic wrap or a teatowel. Don't seal the bowl completely. If using a plastic container with a lid do not put the lid on completely. You want to allow gases to get in and out. This is a living thing baby, let it breathe. Leave on bench/bed/windowsill/table for at least 2 hours, more if you like. No harm can come to it. Don't put it in the sun.
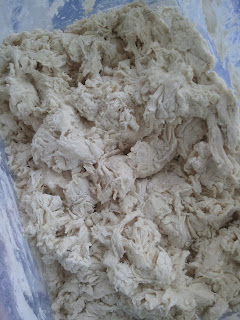
New dough
 (I do this in a plastic container that I just reuse. Don't wash it between batches, the leftovers make the next batch better and the one after that better again.)

After 2 hours, you can use it straight away, or store it in the fridge for later. Either way, instructions follow. You've got enough here for at least 4 decent sized loaves, more if you make smaller ones, obviously.
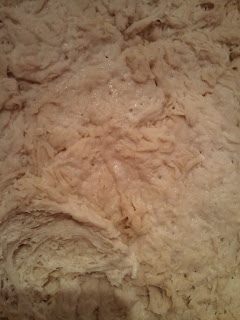
Dough after it's been in the fridge.  See bubbles formed.
To make bread, heat oven to 230C, including a flat oven tray in the centre of the oven and a roasting dish or similar on a shelf under the tray. This is for creating steam to crispen the crust.
Then grab a handful or two or three of the dough. Now, it is likely to be quite sticky, so you will probably want to dust you hands with flour first. The flour is just to limit the amount of dough that stays on your hands, not for making the dough drier.
Dough is quite sticky
Shape the dough into whatever approximate shape you want your bread to be. It will rise, so keep that in mind. When shaping you want to pull the parts of the dough under so that the top is stretched across it. This is what Elaine McCardel from Michigan calls a gluten cloak. The bottom will be untidy, but that's fine.
Shaped dough before it gets 'slashed'
Place this mound lovingly on a piece of baking paper or, better still, a reusable baking sheet on another baking tray or something else flat (so you can slide it all off later). Wander off (or to Vogeltown) for 30 mins. When you get back, and provided your oven is hot, sprinkle the dough with something if you want to (sesame seeds, extra flour, rosemary, salt, oil, an egg wash...) and then make some neat or not slashes in the top of the dough with a nice sharp knife. The slashes are important. Don't worry if the dough doesn't look like it's risen (mine never really does). It will do so in the oven (believe me).

Gently slice the paper/sheet and bread on to the hot baking tray. Pour a cup of cold water into the hot roasting dish to create steam. Cook for 20-35 minutes depending on the size of the loaf (until the bottom of the bread sounds hollow when tapped).

Cool on a rack. It's true that this bread's texture improves when its cooled down, but it's very hard to wait. If you don't wait, nothing bad will happen! I store uneaten bread (of which there is very little) wrapped in a teatowel in the cupboard, not the fridge. But it's definitely best on the day it's cooked.
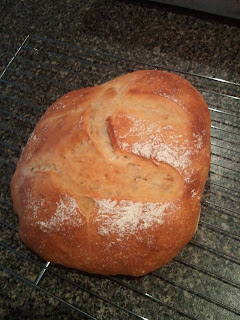
Crispy morning bread
 According to Elaine you can experiment with different mixtures of flours. Go for it. I have been experimenting with shapes. I've made long loaves, round buns and sort-of-flat bread – flat enough to slice horizontally and fill. That last one had rosemary and salt on it, and criss-cross slashes. All were a triumph!
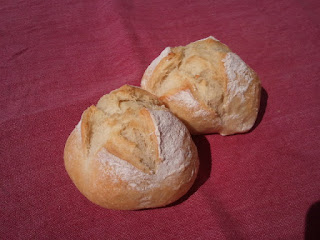
Dinner Rolls
Let me know how you get on.

Here's Elaine's lovely blog on this exact subject: The Italian Dish Artisan Bread

Check out the rest of her site too. It's a trea.

Saturday 11 February 2012

Hot and Cold Smoked Salmon Terrine (easier than it sounds!)

Served on a platter for everyone to help themselves
One of the joys of cooking is that you can make it the way you like it, rather than how someone else makes it. This recipe called for dill in the original, and while I acknowledge that dill and seafood are alleged to have a natural affinity, I don't go for it myself.

Plus Pav and I really like hot smoked salmon (and have been known to make our own), so we used that as a mixer with the originally suggested cold smoked salmon (in the mousse, not the wrapping).

The difference between hot and cold smoking is that hot smoking is at a higher temperature than cold smoking – usually above about 75C – and it therefore cooks the food while it is smoked. Cold smoking imparts the smoked flavour but does not cook the food. In order to preserve anything being cold smoked curing or cooking or salting or some other preservation method is required in addition to smoking.

Also, it had horseradish and I didn't have any, so I used its close relative wasabi. Worked a treat. 

This is a terrine, which makes it sound difficult, but because it's not layered, it's brilliantly easy.  And super delicious.  

Smoked Salmon Terrine with Apple, Cucumber and Caper Relish
Adapted from a Celia Harvey recipe from Cuisine Issue #149.

Start the day before serving, or at least the morning of the evening. First line the sides and base of a terrine or loaf dish with a layer of cling film. Sprinkling the inside of the dish with a bit of water helps the film to cling. Mine is 22cm x 12cm and worked perfectly with this amount of ingredients. Make sure the film hangs over the edges enough to fold over completely.

Place the following in a food processor or bowl:
  • 450g hot smoked salmon pieces, broken up
  • 100g cream cheese (don't skimp on the fat content here) a bit warmer than fridge temperature
  • 2T chopped parsley
Mix until just combined. Gently stir through the following:
  • 300g crème fraiche or quark or similar
  • juice of one lemon
  • pinch of cayenne pepper
That's now your mousse lining for the terrine. Frankly, it's so nice you could just use it as a dip without completing the rest of the dish! (But the rest is great too, so do keep going!).

Line the sides and base of the dish with
  • 300g cold smoked salmon slices (best to buy pre-sliced), hot smoked won't work for this part
Making sure that the pieces line up well, so that the mousse when poured in won't push through this wrapping. Keep enough slices to line the top (which will be the bottom when turned out). 
Before covering with slices
 Pour in the mousse, smooth it out, cover with the remaining cold smoked salmon slices slices and wrap with the cling wrap. Chill for at least 8 hours. 
All wrapped up and ready for the fridge
When ready to serve lift out, unwrap and serve with relish to follow. Garnish with extra chives (from the relish) or parsley (from the mousse) or both.

For the relish, sprinkle
  • 2 green apples, peeled, cored and cut into fine matchsticks, sprinkled with 2T white vinegar to prevent browning
gently fold in
  • 2T capers drained and chopped to a fine paste
  • 2 lebanese cucumbers diced into 5mm pieces
  • 2T finely chopped chives
  • 2T grated horseradish or wasabi
  • black pepper
You can either slice the terrine and plate with relish and crackers/bread. Or serve on a large platter, which is what we did. It serves 8-10 easy.

I hope you enjoy it as much as we did. Feel free to fiddle with the ingredients to get your perfect mix, just like we did.

Thursday 19 January 2012

A quick, versatile curry recipe


could have done with some fresh coriander to pretty it up a bit
We do a lot of stir-frying, Pav and I.  A bit of meat, some chopped veges, sauce and away you go.  Quick, tasty and healthy.  There are other options though.  This recipe is for a quick curry that is pretty low fat and versatile too.  It takes about 12 minutes for beef, and about 15 or so for chicken.  This recipe involves a bit of stir-frying, so my theme works well!

I usually make it with chicken, but since Pav had bought some beef for a possible stir-fry we used beef.  It was fab.  Best of all, you probably have everything you need in the house already. 

It's adapted a bit from Classic Indian published by Hermes House.  I make it for two, but you can easily double or triple it. 

First cut an onion into quarters and chop it with a small garlic clove in a food processor for about a minute. 

Then add the following to the food processor:

  • 1 tablespoon tomato puree or paste (or a small pealed tomato – take out the seeds)
  • handful of raw cashews (I refuse to call them nuts, cos they're seeds)
  • ¾ teaspoon of garam masala
  • ½ teaspoon of chilli powder
  • ½ teaspoon salt
  • ½ tablespoon of lemon juice
  • ½ tablespoon of natural plain yoghurt

Process for another minute.

Heat a tablespoon of oil in a wok or frying pan to a medium heat, add the onion/spice mixture and a couple of pinches of turmeric and then stir-fry the it all for a couple of minutes. 

Add:

  • a tablespoon of fresh chopped coriander
  • 200g stir-fry beef or boneless chicken chopped into chunks (I'm sure it works with lamb or turkey too, but I've not tried it)
  • (handful of sultanas if doing the chicken version, also some button mushrooms if you're into those)

Stir-fry for a minute.  Then add just under half a cup of water.  Stir and biff a lid on it.  (I cook this in a wok and I use a flat oven tray as a lid.)

For chicken simmer for about 10 minutes over a low heat until the chicken is cooked through.  If the sauce needs to thicken a bit, then cook for a short while without the lid.  For beef, simmer about 7 minutes.  The beef doesn't need to be as well cooked as the chicken. 

Serve with some rice and pappadums and sprinkle with more chopped fresh coriander.  Maybe some steamed bok choi or other greens too.    

I hope you enjoy it.